Monday, April 19, 2010
Feature in The Crafty Brides Blog
Two of my best selling dresses were featured today in a blog shout out. Check out the Crafty Brides Blog.
Tuesday, April 13, 2010
Just Featured in Etsy.com Email This Morning

My spring fling yellow chiffon dress was just featured in the latest Etsy.com email that goes out to thousands of subscribers.
You can spot it in the email as the bright yellow dress (the first dress in the email). I've included a photo of the top part of the Etsy email - to the left - so you can see where it's located.
You can check out the latest email (for a limited time) right here.
For those of you who don't know Etsy is a marketplace to buy and sell all things hand made. I sold my first dress on Etsy a little over a year ago - so they have a special place in my heart.
This is the second dress of mine that's been featured in an email. The first was the white silk chiffon (I call the mummy dress). Which was featured about a year ago. Check out my first dress featured on Etsy.

Samples on Etsy
For those of you who don't know - I sell all of my dresses and now workroom samples on Etsy.com. You can get some truly -- one of a kind pieces from my workroom -- that aren't available anywhere else online. I have them up only on Etsy right now - to showcase the pieces that I'm working on. Check out my Etsy Showroom.
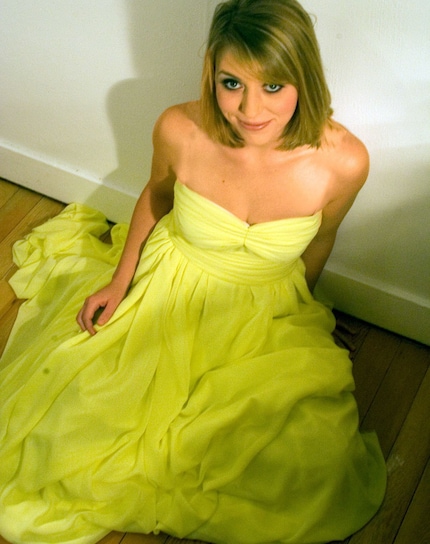
Spring Fling Dress:
This dress is quickly becoming my most popular dress for weddings. I have done this dress in a number of different colors and lengths for weddings.
To the right is a larger picture of my yellow version of the Spring Fling Dress.
Monday, April 5, 2010
Beauty White Sand Crunchy Silk Taffeta
In this article I will go through the process of design to creation of one of my top selling dresses, the 'black beauty gown'. Here I have made a customized version of my customer favorite dress in a white sand color for a customer.
Getting it Down on Paper:

First I come up with a rough sketch. Keep in mind I may be the worst sketcher out there. But I find it's important to get your ideas down even if you're the only one who understands the complexity of what you're doing. So even if you are also horrible at sketching get something down on paper. Include fabric samples, notations, anything that will help capture your thought long enough, so you'll have time to create it in the workroom.
I use a fashion croqui as my base sketch -- that way I can get a proportional final look.
While sketching I think about what fabric I want to use and how the weight and movement of the fabric will fall on the body. In addition I always design with a specific women's body type in mind. Usually this is an afterthought -- in which -- stylist will match the dress that has been created to fit their clients body best. In my case, I like to design with a specific shape in mind -- in order to create a look that will enhance (and hide) all the great things about that body shape.
In this look I have focused on the pear, triangle and hourglass shapes. Now this doesn't mean that other body shapes couldn't pull this dress off - it just means I'm focusing on enhancing these shapes specifically. (The model in my first photo shoot with this dress had an athletic body type (rectangle, proportional hips, waist, and shoulder widths) -- and pulled it off fabulously.

Building a Proper Foundation:
After my sketching is complete. I build the foundation of my dress. Which in this case may actually take longer than the 'outer dress' to finish.
I start with a bustier or corselette -- because I want the dress to fall from the waist or just below the waist and I want the upper part of the dress to be secure. It is a strapless dress and with this much yardage (at least 8 yards in the skirt, not including the lining) we'll want it to rest on the hips. The corset resting on the hips will make sure that the chest doesn't slide down from the weight of the skirt.
Then we build the tiered skirt.
After the skirt and bustier components are complete. I connect the two pieces together at the waist.
Preparing the Fabric:
I wanted to do something different with the fabric for this dress. This is where the sketch falls shorts. I have decided to vertically crinkle silk taffeta to give it random vertical pleating. The process for doing this is simple but can be time consuming.
First I take the fabric and determine the proper lengths that I will need for the skirt, bodice center, bust, and back bustle. I cut the fabric to those lengths and then crinkle by section. This makes it easier to manage smaller pieces.

I dip the sections into water (yes, I just put silk in water). Then I ring out the piece by twisting the fabric in the direction I want the crinkle pleats. I then roll the pieces in a white towel to get as much excess water out. Now there are many ways to set the crinkles. Due to time restraints, I will be setting these with a iron press. You can also twist the fabric around a rod and let air dry for a few days.
After I have gotten as much moisture out of the fabric as possible - I then take it to my heat press - where I will set the crinkles.

I undo the twists of fabric and lay them out so I can see the crinkles. Then by crunching the fabric by hand I set the crinkles into the fabric by heat pressing until the entire (10+ yards) amount of fabric is dry to the touch.
Since this texture gives the dress it's unique look and flow -- I spend a good amount of time making sure the pleats are set correctly.
Now it's time to take the fabric to the form and finish pinning the dress to the foundation of the garment. Where I will then hand sew the final pieces into place.
After getting the fabric to the dress form - I start by pinning the skirt into place. Keep in mind this design has no front or side seams (only back seams). So the front/side piece is approx 6 yards of fabric. I then pin in the back longer piece that will train out. Then work my way up. Pinning the bodice mid section, then the bust, and finally taking the bust and mid sections to the zipper. The bodice bust & mid sections are also one piece (so there are no side or back seams).
The First Fitting:
The first fitting in person is still something that makes me nervous. This was a rush order for a wedding dress so I was especially anxious for the fitting. Britta was awesome and amazingly calm for someone being married in just a few days (and trying her dress on for the first time). For the first fitting I leave the bottom hem raw so that I can pin up the final length with the Bride, Britta, in person with her shoes on.


I pin the skirt length in place. And shorten the train in the back to Britta's liking. After the first fitting we decide to drop the waist, take in the bust, add volume to the skirt and back bustle.
Actual fittings with the bride and the designer/sewer can be very exciting. You have the opportunity to make the dress fit the shape of the customer exactly and add extra details that are hard to find in a dress on the rack.
Final Adjustments:

I get to work right away on the adjustments. I add an extra layer of lining to the inside bodice of the dress as well as under the bodice mid section front --- to make sure none of the bustier boning can be seen through the dress.
I make many of the final adjustments by hand - to ensure a proper fit.
First I pin the final adjustments into place on the dress form. Once I'm satisfied with the overall look I sew the adjustments into place.

I size down the cups so there are no gaps in the final fit. Hem the bottom hem by hand so that the crinkles can maintain their look at the bottom of the gown. To the foundation of the dress I add two more layers of volume to the skirt section so the dress will A-line better to Britta's body shape best.
The Final Touches:
After the hem is in place, and before I sew together the final section of the hem I sew in a horseshoe for good luck on Britta's wedding dress. It is a tradition that couturier's sew in a good luck charm in to the dress and I continue on the tradition. I have made a horseshoe out of the same fabric as the dress and sewn it discretely to the underside of the bottom hem.

With the dress placed on the mannequin I make any final adjustments to the crinkles, and overall look of the dress by hand sewing. After I am completely satisfied with the look of the dress and it is ready for the final fitting I sew in my tag.
Below are some of the final pictures I took of the dress before Britta's final fitting.
~ Steph


Tuesday, January 12, 2010
Get Ready for 2010
If you have been following me on Etsy - you know about my evening gown collections. Now as we dive into 2010 I'm finalizing two other collections as well as another evening gown collection. So what are they? Get ready for three great varities of my designs in 2010:
As my fan base on Etsy has been growing - so has the needs of my customers. Though you all love what I'm doing in evening wear - the truth is that most of us aren't in need of a new gown every season (or even every year for that matter). So taking your feedback and looking at all my "other sketches" from the last few years - I decided to start putting up "mini-collections" of some of the other things I'm working on. Specifically Resort Wear and Intimates.
Over the next few months you'll be able to buy my sample collections on Etsy. They will be limited runs of resort wear and intimates. I will be posting my new looks and samples - like crazy - all over the net. Whether you're following me on my blog, Etsy, Twitter, or Facebook - you'll be able to vote on every thing from style, cut, fabrics, and colors. Your input will help shape and finalize my Spring/Summer collection and will help begin to mold a larger collection for Fall/Winter 2010/2011.
In addition to posting what I've created - I will also be updating this blog with everything from sketches to pictures of final samples. Basically I'll be tracking my whole progression from original concept to final product. I hope you'll have fun watching the whole process from start to finish and I look forward to interacting with you to create my most exciting collection thus far.
Thank you for reading, tweeting, and passing on my blog and gowns (& now Intimates and Resort Wear) to the masses!
Best Wishes in 2010,
Stephanie
- Evening Gowns
- Resort-Wear
- Intimates
As my fan base on Etsy has been growing - so has the needs of my customers. Though you all love what I'm doing in evening wear - the truth is that most of us aren't in need of a new gown every season (or even every year for that matter). So taking your feedback and looking at all my "other sketches" from the last few years - I decided to start putting up "mini-collections" of some of the other things I'm working on. Specifically Resort Wear and Intimates.
Over the next few months you'll be able to buy my sample collections on Etsy. They will be limited runs of resort wear and intimates. I will be posting my new looks and samples - like crazy - all over the net. Whether you're following me on my blog, Etsy, Twitter, or Facebook - you'll be able to vote on every thing from style, cut, fabrics, and colors. Your input will help shape and finalize my Spring/Summer collection and will help begin to mold a larger collection for Fall/Winter 2010/2011.
In addition to posting what I've created - I will also be updating this blog with everything from sketches to pictures of final samples. Basically I'll be tracking my whole progression from original concept to final product. I hope you'll have fun watching the whole process from start to finish and I look forward to interacting with you to create my most exciting collection thus far.
Thank you for reading, tweeting, and passing on my blog and gowns (& now Intimates and Resort Wear) to the masses!
Best Wishes in 2010,
Stephanie

